How Do I Automate My Homelab During a Power Outage?
My homelab uses several uninterruptible power supplies (UPS) – including models from Eaton and CyberPower – to protect servers, NAS devices, and network equipment during power outages. Up until now, each UPS operated more or less independently, with no central monitoring or automated shutdown process.
That’s about to change: With the help of Network UPS Tools (NUT), I want to make my entire setup smarter and more resilient. NUT is an open-source project that supports a wide range of power devices, including UPS systems, power distribution units (PDUs), solar charge controllers, and power supplies. It provides a centralized platform for monitoring, management, and automation – both locally and across the network.
My goals:
- Central monitoring of all UPS devices
- Automated shutdown of servers during power outages
- Integration with Home Assistant for smart home connectivity
- Optional visualization with tools like Uptime Kuma
- Web interface using PeaNUT via Docker
In this article, I’ll walk you through how I installed, configured, and expanded NUT in my homelab – step by step.
Installing NUT
In my homelab, I use multiple UPS units – including an Eaton UPS connected via USB to a Raspberry Pi 3B. This Pi runs Ubuntu Server (a Debian-based OS) and acts as a dedicated local NUT server – solely for this one UPS.
That’s because each UPS in my setup will have its own NUT server, running on the device that’s physically connected to it. The systems powered by a given UPS will later connect to that specific server to query the UPS status or perform an automated shutdown during a power outage.
Step 1: Connect to the server via SSH
ssh user@pi-server.lan
Step 2: Update the system
sudo apt update && sudo apt upgrade
Step 3: Install NUT
Install Network UPS Tools (NUT), including the server, client, and diagnostic tools:
sudo apt install nut
Configuring NUT
After installing NUT, the next step is to detect the connected UPS and properly configure it within the system. To do this, we use the nut-scanner tool, which automatically lists available devices. However, there are a few quirks to be aware of when running this on Ubuntu Server.
Step 1: Run nut-scanner
sudo nut-scanner -U
On my systems, this command initially throws a number of warnings:
Cannot load USB library (libusb-1.0.so) : file not found. USB search disabled.
Cannot load SNMP library (libnetsnmp.so) : file not found. SNMP search disabled.
Cannot load XML library (libneon.so) : file not found. XML search disabled.
Cannot load AVAHI library (libavahi-client.so) : file not found. AVAHI search disabled.
Cannot load IPMI library (libfreeipmi.so) : file not found. IPMI search disabled.
Cannot load NUT library (libupsclient.so) : file not found. NUT search disabled.
These warnings indicate that certain libraries are missing or couldn’t be loaded. The good news: For basic USB detection of the UPS, it’s usually enough to work around the missing libraries by creating symbolic links. Here’s a GitHub thread discussing this workaround.
Step 2: Create symbolic links for missing libraries
For pi-server.lan (Raspberry Pi, ARM64):
cd /usr/lib/aarch64-linux-gnu/
sudo ln -s libusb-1.0.so.0 libusb-1.0.so
sudo ln -s libavahi-client.so.3 libavahi-client.so
For sumpfgeist.lan (x86_64 server):
cd /usr/lib/x86_64-linux-gnu/
sudo ln -s libusb-1.0.so.0 libusb-1.0.so
sudo ln -s libavahi-client.so.3 libavahi-client.so
Note: I couldn’t create symlinks for
libnetsnmp.so,libfreeipmi.so, orlibneon.so, as those files were completely missing on my systems. Fortunately, they’re not required for basic USB functionality.
Step 3: Scan results from nut-scanner
pi-server.lan (Eaton Ellipse 650 PRO):
Scanning USB bus.
[nutdev1]
        driver = "usbhid-ups"
        port = "auto"
        vendorid = "0463"
        productid = "FFFF"
        product = "Ellipse PRO"
        serial = "G355M3xxxx"
        vendor = "EATON"
        bus = "001"
        device = "004"
        busport = "005"
        ###NOTMATCHED-YET###bcdDevice = "0100"
sumpfgeist.lan (CyberPower CP1600EPFCLCD):
Scanning USB bus.
[nutdev1]
        driver = "usbhid-ups"
        port = "auto"
        vendorid = "0764"
        productid = "0601"
        product = "CP1600EPFCLCD"
        serial = "BHYNZ200xxxx"
        vendor = "CPS"
        bus = "003"
        device = "003"
        busport = "001"
        ###NOTMATCHED-YET###bcdDevice = "0200"
Both UPS devices – Eaton Ellipse 650 PRO and CyberPower CP1600EPFCLCD – were correctly detected. Now it’s time to configure them in the ups.conf file.
Step 4: Add UPS entry to /etc/nut/ups.conf
pi-server.lan
[server-room-rack]
    driver = "usbhid-ups"
    product = "Ellipse PRO"
    desc = "Server Room Rack UPS"
    port = "auto"
    vendorid = "0463"
    productid = "FFFF"
    bus = "001"
sumpfgeist.lan
[ups]
    driver = "usbhid-ups"
    product = "CP1600EPFCLCD"
    desc = "HomeLab UPS"
    port = "auto"
    vendorid = "0764"
    productid = "0601"
    bus = "003"
Edit the file with:
sudo nano /etc/nut/ups.conf
Configuring the NUT-Server
After defining the connected UPS devices in ups.conf, the next step is to prepare the NUT server for network use. This involves editing several configuration files, creating user accounts, and enabling server mode.
Step 1: upsd.conf – Enable network access
sudo nano /etc/nut/upsd.conf
Add the following line to allow incoming connections on port 3493 from all interfaces:
LISTEN 0.0.0.0 3493
Alternatively, you can restrict access by specifying the IP address of the host instead of 0.0.0.0.
Step 2: upsd.users – Create users for NUT services
This file defines user accounts with different privileges. These users are later used by upsmon or web interfaces.
sudo nano /etc/nut/upsd.users
pi-server.lan
[admin]
    password = secure_password
    actions = SET
    actions = FSD
    instcmds = ALL
    upsmon primary

[monuser]
    password = secure_password
    upsmon secondary
sumpfgeist.lan
[admin]
    password = secure_password
    actions = SET
    actions = FSD
    instcmds = ALL
    upsmon primary

[monuser]
    password = secret
    upsmon secondary
Note: The passwords above are for demonstration only. Always use strong, unique passwords and store them in a password manager if needed.
Step 3: upsmon.conf – Configure the UPS monitor
The UPS monitor (upsmon) handles power monitoring and triggers actions like automated shutdowns during outages. Edit the configuration with:
sudo nano /etc/nut/upsmon.conf
pi-server.lan
MONITOR server-room-rack@localhost 1 admin secure_password primary
sumpfgeist.lan
MONITOR ups@localhost 1 admin secret primary
Syntax:
MONITOR <UPS-name>@<host> <power-value> <username> <password> <primary|secondary>
Step 4: nut.conf – Set the operating mode
Finally, define the operating mode for the NUT service:
sudo nano /etc/nut/nut.conf
Change:
MODE=none
to:
MODE=netserver
With that, the NUT server is ready for network use and can now serve status data and respond to client requests.
Restarting NUT Services
After configuration, we need to restart the NUT services and ensure they launch automatically at system startup.
For Debian/Ubuntu-based systems:
sudo systemctl restart nut-server
sudo systemctl enable nut-server

sudo systemctl restart nut-monitor
sudo systemctl enable nut-monitor
This ensures that both the NUT server (nut-server) and the monitoring service (nut-monitor) start automatically after boot.
For Alpine Linux:
On Alpine Linux, services are managed via OpenRC. For a complete server setup, both nut-upsd and nut-upsmon must be started and added to the default runlevel:
doas rc-service nut-upsd restart
doas rc-update add nut-upsd default

doas rc-service nut-upsmon restart
doas rc-update add nut-upsmon default
This makes the NUT server on Alpine Linux fully operational and ensures it starts automatically after a reboot.
Verifying NUT Functionality and Troubleshooting
Once the NUT server is correctly configured and running, you can test communication with the connected UPS using the upsc command.
Display UPS data
upsc <UPS-NAME>
Example on pi-server.lan:
upsc server-room-rack
Example on sumpfgeist.lan:
upsc ups
Common error after configuration
If you see the following error on first run: Error: Driver not connected
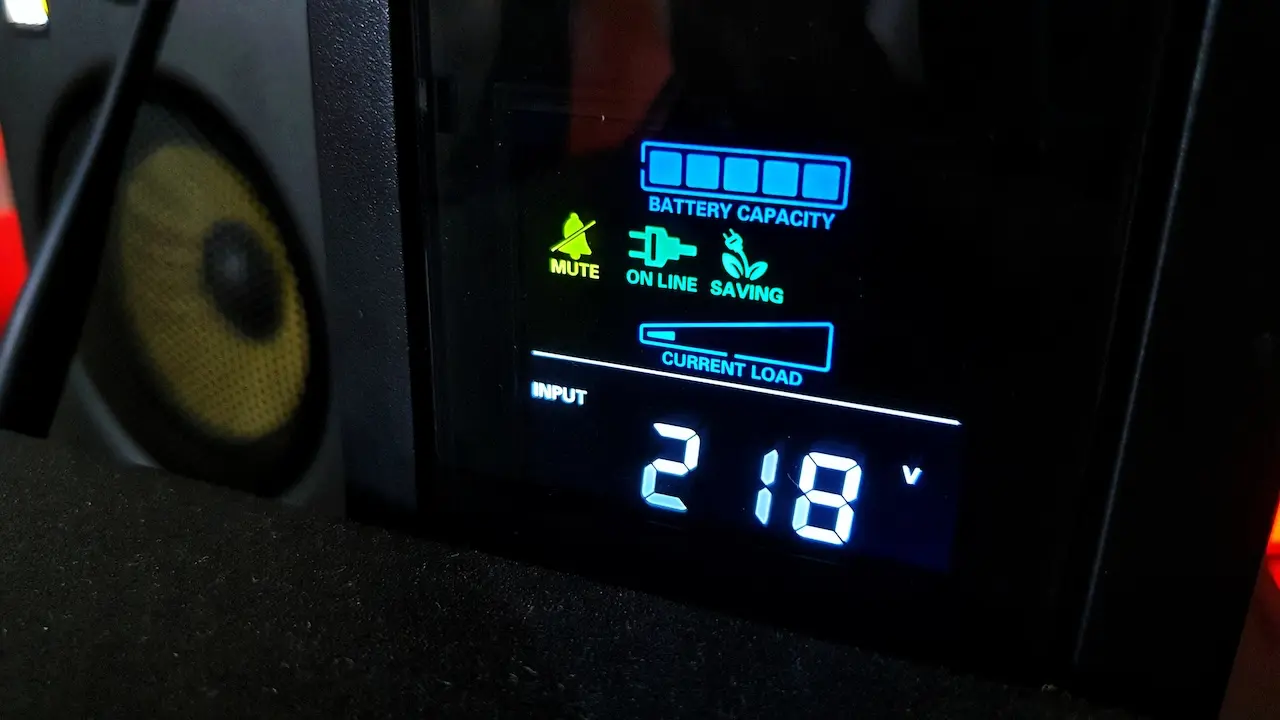
It could be due to a faulty or incomplete USB connection. In one case, simply unplugging and reconnecting the USB cable resolved the issue. After that, the UPS was recognized correctly, and upsc returned detailed status output like this:
Eaton Ellipse 650 PRO
Init SSL without certificate database
battery.charge: 100
battery.charge.low: 20
battery.runtime: 1734
battery.type: PbAc
device.mfr: EATON
device.model: Ellipse PRO 650
...
CyberPower CP1600EPFCLCD
Init SSL without certificate database
battery.charge: 100
battery.charge.low: 10
battery.charge.warning: 20
battery.mfr.date: CPS
battery.runtime: 3750
battery.runtime.low: 300
battery.type: PbAcid
battery.voltage: 27.4
battery.voltage.nominal: 24
device.mfr: CPS
device.model: CP1600EPFCLCD
...
Recurring error after reboot
In another case, the same error reappeared after a system reboot. However, this time reconnecting the USB cable didn’t fix the issue.
Running nut-scanner revealed the cause:
sudo nut-scanner -U
The output showed that the USB bus and device numbers had changed:
At the time of installation:
bus = "003"
device = "003"
After reboot:
bus = "004"
device = "006"
As a result, the driver could no longer locate the UPS. Solution: Manually update the /etc/nut/ups.conf file to reflect the new bus number:
sudo nano /etc/nut/ups.conf
Change bus = "003" to bus = "004" and save the file. After restarting the service, the UPS should be reachable again, which you can verify with:
upsc ups
You should also see its status back to online on https://usv.techlab.icu
Such issues should never go unnoticed – especially not during a power outage. It’s highly recommended to set up automated monitoring that includes:
- UPS status checks
- Notifications in case of connection errors
The next section of this article will cover how to implement such monitoring and alert mechanisms.
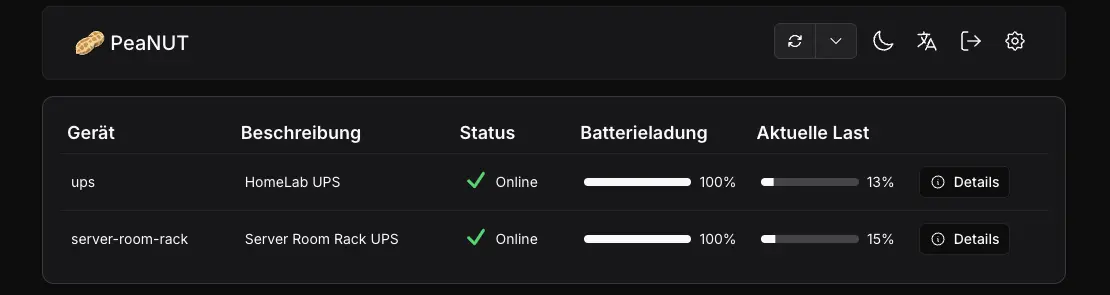
Monitoring UPS Status with Uptime Kuma
I monitor the status of my UPS devices using Uptime Kuma, by querying the JSON API provided by PeaNUT. For each UPS, I’ve set up two HTTPS monitors that check the following endpoints:
Each monitor looks for two key indicators:
- The string
"ups.status":"OL"indicates that the UPS is online and currently receiving utility power. - If the text
Device Unreachableis found, it means the UPS is no longer reachable.
This could be caused by a connection issue or a failed NUT service. Power may still be present, but that cannot be guaranteed.
For better organization, I’ve grouped the two checks per UPS into logical groups:
UPS [server-room-rack]UPS [usv]
This way, I can immediately see if a UPS is offline, if mains power has failed, or if both issues occur simultaneously.
Notifications are sent from Uptime Kuma to Gotify. Both services are running in Docker containers. If you’re interested, I may write a follow-up blog post covering that setup in more detail.
Deploying PeaNUT with Docker
PeaNUT is a lightweight web dashboard for Network UPS Tools (NUT) – perfect for visualizing UPS status. The application is easy to deploy using Docker.
Here’s my docker-compose.yaml file for deploying PeaNUT:
services:
  peanut:
    image: brandawg93/peanut:latest
    container_name: PeaNUT
    restart: unless-stopped
    volumes:
      - /home/sz/docker/peanut/config:/config
    networks:
      peanut:
      proxy:
        ipv4_address: 192.168.x.x
    ports:
      - 8080:8080
    environment:
      - WEB_PORT=8080
      #- WEB_USERNAME="admin"
      #- WEB_PASSWORD="admin1234"
    labels:
      - "traefik.enable=true"
      - "traefik.http.routers.peanut.entrypoints=http"
      - "traefik.http.routers.peanut.rule=Host(`usv.techlab.icu`)"
      - "traefik.http.middlewares.peanut-https-redirect.redirectscheme.scheme=https"
      - "traefik.http.routers.peanut.middlewares=peanut-https-redirect"
      - "traefik.http.routers.peanut-secure.entrypoints=https"
      - "traefik.http.routers.peanut-secure.rule=Host(`usv.techlab.icu`)"
      - "traefik.http.routers.peanut-secure.tls=true"
      - "traefik.http.routers.peanut-secure.service=peanut"
      - "traefik.http.services.peanut.loadbalancer.server.port=8080"
      - "traefik.docker.network=proxy"

networks:
  peanut:
  proxy:
    external: true
The web interface will then be accessible at https://usv.techlab.icu – secured via Traefik with TLS.
To connect to NUT servers, edit the settings.yml file inside the configuration directory. My setup looks like this:
NUT_SERVERS:
  - HOST: 192.168.x.x
    PORT: 3493
    USERNAME: admin
    PASSWORD: secure_password
  - HOST: 172.19.x.x
    PORT: 3493
    USERNAME: admin
    PASSWORD: secret

INFLUX_HOST: ""
INFLUX_TOKEN: ""
INFLUX_ORG: ""
INFLUX_BUCKET: ""
INFLUX_INTERVAL: 10
Managing Connected UPS Devices
In addition to monitoring status, UPS devices can also be controlled directly from the command line. For this purpose, Network UPS Tools (NUT) provides the upscmd utility.
For example, the following command lists all available commands for the UPS named server-room-rack:
upscmd -l server-room-rack
Example: Controlling the Beeper
A common use case is disabling or re-enabling the audible alarm (beeper). This requires a valid username and password:
# Disable beeper
upscmd -u admin server-room-rack beeper.disable

# Enable beeper again
upscmd -u admin server-room-rack beeper.enable
After entering the password, the command will be confirmed with OK. The UPS accepts these commands directly via the NUT protocol.
Other Useful Commands
Below is a selection of useful commands, depending on the specific UPS model:
| Command | Description |
|---|---|
| load.off | Immediately turn off the load |
| load.off.delay | Turn off the load after a delay |
| load.on | Immediately turn on the load |
| load.on.delay | Turn on the load after a delay |
| shutdown.return | Power off the load, then turn it back on automatically when power returns |
| shutdown.stayoff | Power off the load and keep it off |
| shutdown.stop | Abort an ongoing shutdown process |
Note: Not all UPS models support all commands. The exact list is device-specific and can be retrieved using
upscmd -l <ups-name>.
Adding Additional NUT-Clients
In a typical homelab, it’s common to have multiple systems connected to different UPS devices. With Network UPS Tools (NUT), you can manage not only the system directly connected to a UPS, but also any other devices powered by the same UPS — even across the network.
To do this, you configure NUT clients. These systems connect to a central NUT server (which is physically connected to the UPS via USB) and receive a shutdown signal in the event of a power outage.
Architecture Overview
- Systems powered by the same UPS → act as NUT clients, connected to a shared NUT server
- Systems with their own UPS → run both a NUT server and a NUT client locally
Example Assignment
NUT-Clients:
sumpfkrieger.lan→ client ofsumpfgeist.lansumpfgeist.lan→ client ofsumpfgeist.lannas.techlab.icu→ client ofsumpfgeist.laneq14.lan→ client ofsumpfgeist.lanpi-server.lan→ client ofpi-server.lan
NUT-Servers:
sumpfgeist.lan→ server for CyberPower CP 1600EPFCLCDpi-server.lan→ server for Eaton Ellipse 650 PRO
Setting Up a Synology NAS as a NUT-Client
A Synology DiskStation can be configured as a network UPS client. You’ll find the relevant settings under:
Control Panel > Hardware & Power > UPS
Settings:
- Enable UPS support
- UPS Type: Synology UPS Server
- Shutdown time: e.g. 3 minutes
- Network UPS server:
192.168.x.x(IP address of your NUT server)
Requirements on the NUT-Server:
To allow the DiskStation to connect, make sure the following configuration is applied on the NUT server:
- The UPS must be named
ups - Username:
monuser - Password:
secret monusermust be configured with thesecondaryrole
Once you click Apply, the DiskStation will establish a connection to the UPS. In the event of a power outage, the NAS will automatically shut down safely after the configured delay — stopping all services, unmounting volumes, and ensuring a clean shutdown before battery power runs out.
Setting Up Additional Servers as NUT-Clients
To allow multiple systems in your network to shut down gracefully during a power outage, you can configure them as NUT clients. These clients monitor the UPS via a central NUT server.
Install on Ubuntu:
sudo apt install nut-client
Check the connection to the NUT server:
upsc server-room-rack@192.168.x.x
upsc ups@192.168.x.x
Install on Alpine Linux:
# Install the package
doas apk add nut

# Test the connection
upsc server-room-rack@192.168.x.x
upsc ups@192.168.x.x
Configure the UPS monitor and edit the upsmon.conf file:
sudo nano /etc/nut/upsmon.conf
or
doas nvim /etc/nut/upsmon.conf
Add the appropriate monitor configuration depending on which UPS supplies power to the client:
If the client is powered by the Eaton Ellipse 650 PRO:
MONITOR server-room-rack@192.168.x.x 1 monuser PASSWORD secondary
If the client is powered by the CyberPower CP 1600EPFCLCD:
MONITOR ups@192.168.x.x 1 monuser secret secondary
Note: The password secret is required for compatibility with Synology NAS devices, which expect this fixed value.
In /etc/nut/nut.conf, change the mode from none to:
MODE=netclient
Now start and enable the client:
sudo systemctl restart nut-client
sudo systemctl enable nut-client
On Alpine Linux:
doas rc-service nut-upsmon start
doas rc-update add nut-upsmon default
Expected output after first start:
doas rc-service nut-upsmon start
 * Caching service dependencies ...                                                                                                                                                                        [ ok ]
 * Starting udev ...                                                                                                                                                                                       [ ok ]
 * Waiting for uevents to be processed ...                                                                                                                                                                 [ ok ]
 * Starting UPS Monitor ...
Network UPS Tools upsmon 2.8.2
fopen /run/upsmon.pid: No such file or directory
Could not find PID file to see if previous upsmon instance is already running!
UPS: ups@192.168.x.x (secondary) (power value 1)
Using power down flag file /etc/killpower
Shutdown Scenario
When the primary NUT server (configured with MODE=netserver) issues an FSD (Forced Shutdown) signal — typically because the UPS battery is running low — this signal is propagated to all connected clients.
Each client then initiates a clean shutdown before power is lost. That’s why each system running nut-client should be configured to monitor the correct UPS by name and IP.
Test Run: Simulating a Power Outage
Before waiting for a real power outage — or unplugging your UPS — you can test your entire NUT setup by manually triggering a Forced Shutdown (FSD) event. This is done from the NUT server using the following command:
sudo upsmon -c fsd
This command simulates a complete shutdown scenario:
All connected clients will receive the shutdown signal and begin shutting down safely. After the configured delay, the UPS itself will power off. At that point, all connected devices will be completely without power.
Note: This command only works locally on the server. It cannot be triggered remotely from a client.
Real-World Experience
Personally, I haven’t used the manual test command yet. Instead, I’ve waited for actual power outages and, when necessary, shut systems down manually. During these real-world scenarios, I was able to successfully observe the full NUT setup in action:
- All connected systems shut down in sequence, depending on their respective battery status.
- The UPS automatically powers off after all systems have shut down safely.
- This prevents the UPS battery from becoming fully discharged, which can happen very quickly under uncontrolled usage.
- Once power returns, the UPS units start back up automatically, and all connected systems boot as if nothing happened.
- I receive real-time push notifications about power outages, shutdown events, and system recovery — thanks to the integration with Gotify.
Once our solar system is fully operational, it’s likely that the UPS units won’t need to shut down completely as often. The additional energy buffer will further improve overall resilience against outages.
Bonus: Integrating NUT with Home Assistant
UPS monitoring via NUT can easily be integrated into Home Assistant. This allows power outages, battery status, and shutdown warnings to be displayed — and automated — within your smart home system.
Adding the Integration
- In Home Assistant, go to “Settings > Devices & Services”.
- Click “Add Integration” and search for “Network UPS Tools (NUT)”.
- A dialog will appear:
- Enter the IP address of your NUT server.
- Leave the port set to the default (
3493). - Provide the username (
monuser) and the corresponding password.
- Optionally, assign or create a room.
Note on Docker-Based Installations
If Home Assistant is running in a Docker container (as in my case on sumpfgeist.lan), the container may not be able to reach the regular host IP address (e.g., 192.168.x.x). In this case, you’ll need to use the internal IP of the Docker bridge, for example:
172.21.0.1
This IP belongs to the Docker bridge (br0) and enables communication between the Home Assistant container and the NUT service running on the host.
With that, we’ve reached the end of this article. The UPS units are no longer isolated devices but now part of an intelligent, connected system. Once the solar power system is integrated, this setup will evolve into a robust and automated energy management solution — requiring no manual intervention, but offering full control and visibility.
Tools Used