My Perfect Keyboard for macOS and Linux
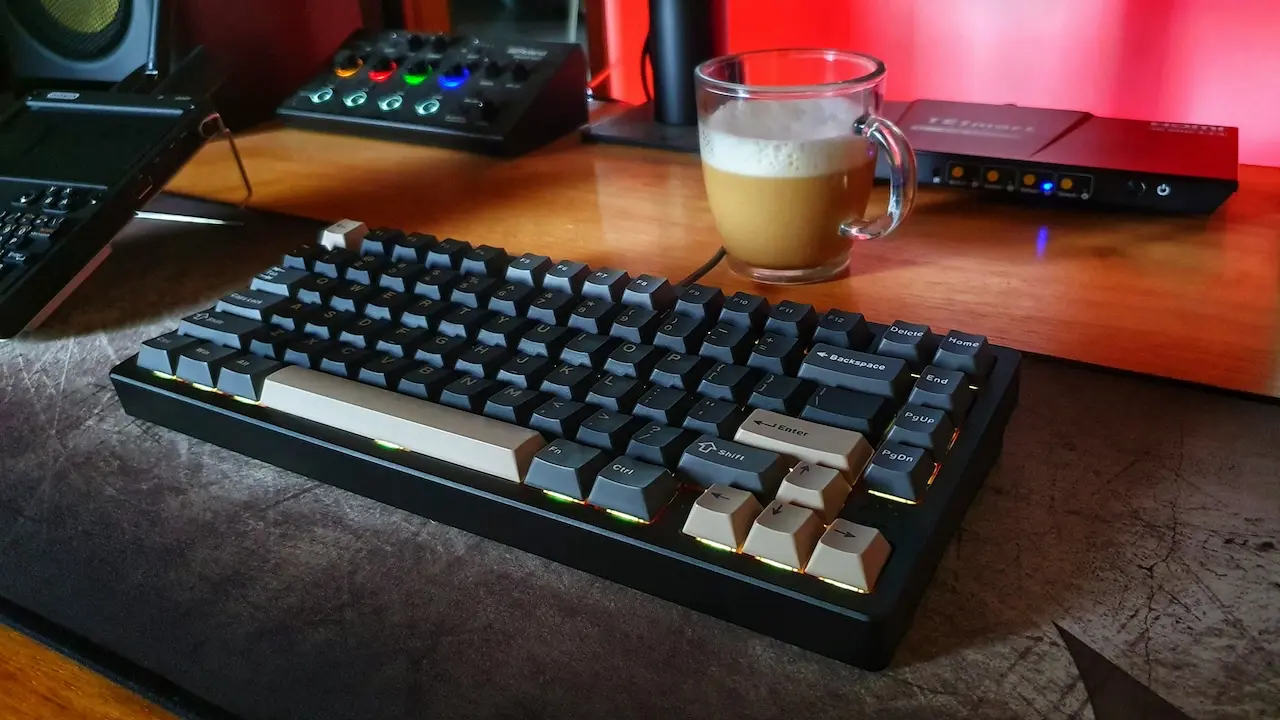
In April 2025, I finally found it: my perfect keyboard. The Rainy 75 Pro from Wobkey isn’t just high quality – it completely won me over from the very first keystroke.
The solid unibody aluminum case, the deep sound profile, and the well-balanced typing feel make it a true standout. But what mattered most to me was seamless integration into my multi-system setup (macOS and Linux) – no cable swapping, no constant reconfiguration.
I use the keyboard via USB on a KVM switch. It’s important not to plug it into the dedicated “keyboard port” on the switch (which only emulates a basic keyboard), but into a regular USB port instead – otherwise, advanced features like macros and VIA compatibility may not work reliably.
In this article, I’ll show how I customized the keyboard to perfectly fit my workflow: including full support for umlauts despite using a US layout, key remapping, and useful macros with keyd and Via.
Why the US Layout?
If you do a lot of programming, you’ll eventually end up using the US keyboard layout – at least that’s what happened to me. Characters like {}, [], or ~ are all easy to reach without awkward key combos, and that makes a real difference in everyday use.
The US layout is also the default in many tools and operating systems. Keyboard shortcuts tend to work more reliably, and when working remotely (e.g., via SSH), you’re less likely to run into issues with mismatched key mappings.
Of course, the downside: no umlauts. But don’t worry – there are elegant solutions for that, both on macOS and Linux.
Umlauts on macOS: Easy with the Win or Right Alt Key
On my Mac Studio, I type umlauts using the following key combinations:
Win+u then u → ü
Win+u then a → ä
Win+u then o → ö
Win+s → ß
Surprisingly, this works very well – without any additional tools or third-party software. The right Alt key serves the same purpose and is actually better than the Win key, since under macOS it acts as the Option key.
Important: The keyboard must be running in Mac mode. You can enable it by pressing and holding Fn + M for at least 3 seconds.
Only then will the macOS-specific key mappings, such as Command (⌘) and Option (⌥), work correctly.
Umlauts on Linux: With keyd and the Compose Key
On Ubuntu with Gnome, the setup was simple: I switched the keyboard layout to English (Macintosh) and selected the left Alt key under Alternative Characters Key. This allowed me to use the same key combinations as on macOS. However, this approach is not recommended – it’s better to use the right Alt key, also known as the familiar AltGr key.
On more minimalist setups like Alpine or Arch Linux – my preferred Linux distributions – this doesn’t work out of the box. That’s where keyd comes into play. And that’s also where I’ll focus, as these are the systems I use on a daily basis.
Thanks to keyd – Keyboard Remapping Done Right
Keyd is a lightweight, system-wide tool for remapping keys – independent of any desktop environment. Perfect for minimal Linux setups.
Installation on Alpine Linux
doas apk add keyd setxkbmap
Or on Arch Linux:
sudo pacman -Sy keyd xorg-setxkbmap
Basic configuration: /etc/keyd/default.conf
[ids]
*

[main]
leftalt = leftmeta
leftmeta = leftalt
This, for example, turns the left Alt key into the Super key (Meta) – and vice versa.
Enabling the Compose Key with setxkbmap
You can activate the Compose key functionality system-wide with the following command:
setxkbmap -option compose:menu
In my .xinitrc, it looks like this:
#!/bin/bash

# set compose key
setxkbmap -option compose:menu
For me, the right Control key becomes the Compose key (which is usually the AltGr key) – ideal for typing special characters and umlauts.
Since my keyboard doesn’t have a dedicated AltGr key, I had previously configured the right Control key as the right Alt key in Via. While AltGr works well for special characters on many Linux desktops, the Compose key is often more flexible – especially in minimalist setups.
Advanced keyd Configuration for Umlauts
For even more convenient input, I created a custom keyd layer called dia. It defines macros for typing umlauts and special characters:
[dia]

# Make o to ö
o = macro(compose o ")

# Make a to ä
a = macro(compose a ")

# Make u to ü
u = macro(compose u ")

# Make e to €
e = macro(compose e =)

# Make s to ß
s = macro(compose s s)
The right Alt key (AltGr) activates this layer:
rightalt = layer(dia)
So for example, AltGr + o gives you ö – much faster and more intuitive than traditional Compose sequences.
Starting the keyd Service
To ensure keyd starts automatically at boot, the following service needs to be enabled:
On Alpine Linux
doas rc-update add keyd
doas rc-service keyd start
Getting an error on startup?
If keyd crashes on startup, it might be due to a conflict with the keyd-openrc package. In that case, try the following sequence:
doas apk del keyd-openrc
reboot
doas rc-update add keyd
doas rc-service keyd start
On Arch Linux
sudo systemctl enable -now keyd
Reloading the configuration
After modifying /etc/keyd/default.conf, you can reload keyd like this:
keyd reload
Copy & Paste in the Terminal
On macOS, copy & paste in the terminal is as easy as using Alt+C and Alt+V. These act as Command+C and Command+V on macOS.
On Linux, things are a bit trickier: In many terminal emulators, Ctrl+C doesn’t copy — it terminates the currently running program. Instead, you often use Shift+Ctrl+C to copy and Shift+Ctrl+V to paste — which quickly becomes inconvenient, especially when switching between systems or apps regularly.
In my setup using st – the minimalist terminal from suckless – copy & paste felt awkward at first.
How I optimized this — including clipboard history and custom shortcuts — is something I’ll cover in an upcoming blog post.
Customize Keyboard Firmware with Via
Via is a web app that allows you to configure compatible keyboards — like my Rainy 75 Pro — with ease.
You can change key mappings, macros, and layers directly in the firmware — no flashing required, just a USB connection.
Important: Via only works if the keyboard is connected directly via USB and not through a KVM switch. Also, Chrome-based browsers are best supported; Firefox does not currently work.
Example: Mapping Ctrl+S to Caps Lock
I replaced the Caps Lock key with a macro that sends Ctrl+S:
- Macro:
{KC_LCTL, KC_S} - Use case: In nvim and tmux, I use
Ctrl+S(instead ofCtrl+B) as my leader key.
This allows me to activate the leader key with a single tap on Caps Lock and that’s super convenient for my daily workflow.
I also used Via to remap the right Ctrl key to function as the right Alt key.
Conclusion
My Rainy 75 Pro isn’t just a visual and tactile pleasure — with the right tools like keyd, setxkbmap, and Via, its functionality reaches an entirely new level. Whether on macOS or Linux, I can work seamlessly, type umlauts with ease, and maintain full control over my custom keybindings.
In future articles, I’ll dive deeper into my Linux setup, including dwm, nvim, and clipboard configuration. If you have questions about the keyboard or any of the configurations, feel free to reach out or leave a comment.
Note: You can find the Rainy 75 Pro on Amazon – this is an affiliate link with no additional cost to you.
Tools I used: